AWS Deployment Blog
AWS Deployment Process for Backend/Database
Prerequisites and Important Links
- Get Accout Credentials: Get the active AWS account from Mr. Mortensen. AWS.
- AWS Cockpit: The AWS cockpit can be found at this link. It is used to look at the status of the server and access the CLI for configuration.
Test Server
Ensure that we have a working frontend-to-backend test server. If it does not work locally, there is no need to try it on deployment.
Subdomain
Setup DNS endpoint through AWS Route 53.
Server: https://prism.stu.nighthawkcodingsociety.com/
Domain: stu.nighthawkcodingsociety.com
Subdomain: prism
Port (Backend)
Select a unique port for the application. Update all locations:
-
main.py: Prepare the localhost test server port to run on the same port for consistency.
if __name__ == "__main__": app.run(debug=True, host="0.0.0.0", port="8505") -
Dockerfile: Prepare this file to run a server as a virtual machine on the deployment host.
FROM docker.io/python:3.11 WORKDIR / RUN apt-get update && apt-get upgrade -y && \ apt-get install -y python3 python3-pip git COPY . / RUN pip install --no-cache-dir -r requirements.txt RUN pip install gunicorn ENV GUNICORN_CMD_ARGS="--workers=1 --bind=0.0.0.0:8505" EXPOSE 8505 ENV FLASK_ENV=production CMD [ "gunicorn", "main:app" ] -
docker-compose.yml: Prepare this file to serve as the “make” for Docker.
version: '3.12.3' services: web: image: prism build: . env_file: - .env ports: - "8505:8505" volumes: - ./instance:/instance restart: unless-stopped -
nginx_file: Prepare this file for reverse proxy (the way this works is that the information is sent from the internet to the application and back to the requester.)
server {
    listen 80;
    listen [::]:80;
    server_name prism.nighthawkcodingsociety.com;
    location / {
        proxy_pass http://localhost:8505; (MINE)
        if ($request_method = OPTIONS) {
            add_header "Access-Control-Allow-Credentials" "true" always;
            add_header "Access-Control-Allow-Origin"  "https://illuminati1618.github.io" always;
            add_header "Access-Control-Allow-Methods" "GET, POST, PUT, DELETE, OPTIONS, HEAD" always;
            add_header "Access-Control-Allow-MaxAge" 600 always;
            add_header "Access-Control-Allow-Headers" "Authorization, Origin, X-Origin, X-Requested-With, Content-Type, Accept" always;
            return 204;
        }
    }
}
Port (Frontend)
Prepare the frontend to access our domain and ports to match our localhost, port 8505 (OURS OURS OURS OURS OURS), and domain settings.
-
assets/api/config.js:
export var pythonURI;
if (location.hostname === "localhost" || location.hostname === "127.0.0.1") {
    pythonURI = "http://localhost:8505";
} else {
    pythonURI = "https://prism.stu.nighthawkcodingsociety.com";
}
Accessing AWS EC2
Login to AWS Console using our account. Access EC2 Dashboard and launch an instance. Select CSP
Alternatively, use Cockpit:
At cockpit.stu.nighthawkcodingsociety.com Username is ubuntu Password hint is 3 Musketeers
Application Setup
- Finding a Port: Run
docker psto make sure port 8505 is open - On localhost setup Docker files using VSCode: Make sure the Dockerfile and docker-compose.yml match port 8505 on AWS EC2.
- Use docker-compose up in the repo folder
- Access the server after it’s done building in browser on localhost:8505
Server Setup
- Clone backend repo:
git clone https://github.com/illuminati1618/prism_backend.git - Navigate to repo:
cd prism_backend - Build site:
docker-compose up -d --build - Test site:
curl localhost:8505
Route 53 DNS
Go to AWS Route 53 and setup DNS subdomain for backend server.
Changing Code will require Deployment Updates
- Run git pull before making changes
- Open terminal in VSCode and run python main.py
- Make changes that are needed
- Commit the changes locally
- Test docker-compose up or sudo docker-compose up in VSCode terminal
- Sync change from UI/git push from terminal
Pulling Changes into AWS EC2 deployment
- Navigate to repo:
cd ~/prism_backend - docker-compose down
- git pull
- Rebuild docker container:
docker-compose up -d --build
Troubleshooting checks on AWS EC2
- Try to curl:
curl localhost:8505 - Run docker-compose ps
- Run docker ps
AWS Flowchart (How it works/Process)

Quick Notes on Deployment (From Mortenson’s Slack Message)
To login to the deployment server on AWS EC2 you will use cockpit backdoor. https://cockpit.stu.nighthawkcodingsociety.com/
The username for the account is shown in the image and is “ubuntu” in all lowercase.You will need to DM Mr. Mortenson if you will be Deployment admin for the 3 Musketeer password.
First Time Install (Steps in Order)
1. Run ./scripts/db_init.py
- This script likely initializes the database by creating tables, inserting default values, or running migrations. This will reset the data tables.
-
To execute:
python3 ./scripts/db_init.py -
Ensure you have the required dependencies installed:
pip install -r requirements.txt
2. In your repo, run Docker commands
-
Docker is used to containerize the application, ensuring a consistent environment.
-
Build the Docker images:
docker-compose buildThis creates or updates the necessary containers.
-
Run the containers in detached mode (-d for background running):
docker-compose up -dThis starts the application and related services (like a database or web server).
3. Test your server, use curl to verify response
-
Check if your container is running:
docker psThis lists all active containers and their assigned ports.
-
Send a request to your application to verify it’s working:
curl localhost:8505
Security Note
- Never store passwords directly in your code.
- Use
.envfiles and never commit them to GitHub. .gitignoreshould include.envto prevent accidental uploads.
NGINX & Certbot Setup
Route 53 DNS
Go to AWS Route 53 and set up a DNS subdomain for the backend server.
NGINX Setup
-
Go to nginx directory and create an Nginx config file:
cd /etc/nginx/sites-available sudo nano prism.stu -
Add the following config:
server { server_name prism.stu.nighthawkcodingsociety.com; location / { proxy_pass http://localhost:8505; if ($request_method = OPTIONS) { add_header "Access-Control-Allow-Credentials" "true" always; add_header "Access-Control-Allow-Origin" "https://illuminati1618.github.io" always; add_header "Access-Control-Allow-Methods" "GET, POST, PUT, DELETE, OPTIONS, HEAD" always; add_header "Access-Control-Allow-MaxAge" 600 always; add_header "Access-Control-Allow-Headers" "Authorization, Origin, X-Origin, X-Requested-With, Content-Type, Accept" always; return 204; } } listen [::]:443 ssl; # managed by Certbot listen 443 ssl; # managed by Certbot ssl_certificate /etc/letsencrypt/live/prism.stu.nighthawkcodingsociety.com/fullchain.pem; # managed by Certbot ssl_certificate_key /etc/letsencrypt/live/prism.stu.nighthawkcodingsociety.com/privkey.pem; # managed by Certbot include /etc/letsencrypt/options-ssl-nginx.conf; # managed by Certbot ssl_dhparam /etc/letsencrypt/ssl-dhparams.pem; # managed by Certbot } server { if ($host = prism.stu.nighthawkcodingsociety.com) { return 301 https://$host$request_uri; } # managed by Certbot listen 80; listen [::]:80; server_name prism.stu.nighthawkcodingsociety.com; return 404; # managed by Certbot } -
Save the file (
Ctrl + X, thenY, thenEnter). -
Link the configuration files:
cd /etc/nginx/sites-enabled sudo ln -s /etc/nginx/sites-available/prism /etc/nginx/sites-enabled -
Check for all proper config syntax and restart Nginx:
sudo nginx -t sudo systemctl restart nginx -
Test if Nginx is serving requests:
Open http://prism.stu.nighthawkcodingsociety.com in our browser.
Certbot Configuration for HTTPS
Here are all the steps we will follow to install Certbot to deploy our site
-
Install Certbot:
sudo apt-get install certbot python3-certbot-nginx -
Run Certbot to get SSL certificate:
sudo certbot --nginx - Follow the prompts:
- Select
prism.stu.nighthawkcodingsociety.comfrom the list. - Choose option
2because it will redirect us from HTTP to HTTPS, which is more secure.
- Select
-
Restart Nginx:
sudo systemctl restart nginx - Test HTTPS access:
Open https://prism.stu.nighthawkcodingsociety.com in our browser.
Updating Deployment
Changing Code in VSCode
Steps:
- Run
git pullbefore making changes. - Open terminal in VSCode and run
python main.py. - Make changes that are needed.
- Commit the changes locally.
- Test
docker-compose uporsudo docker-compose upin VSCode terminal. - Push changes to GitHub.
Pulling Changes into AWS EC2 Deployment
-
Navigate to repo:
cd ~/prism_2025 -
Stop running containers:
docker-compose down -
Pull the latest code:
git pull -
Rebuild the docker container:
docker-compose up -d --build
Debugging NGINX
-
If something fails, we will check Nginx logs:
sudo tail -f /var/log/nginx/error.log
Notes from CB Big Idea 4
The internet is just a network of connected computers, and AWS provides a bunch of services such as compute, storage, and networking.
TCP handshake to establish a connection:

What happens when you open a webpage hosted on AWS
When you open a webpage hosted on AWS, your browser sends a request through the Internet to a remote server on AWS. Routers and switches help forward the packets until they reach the AWS server, which returns the webpage data. This process uses TCP/IP protocols and handshake to ensure reliable transfer. Once the data arrives back at your computer, the browser displays the webpage content.
The network layer of the TCP/IP protocol is responsible for accepting and delivering the packets that contain the data of our website.
Start Deployment Procedures
System Info (Image 1)
- Go to the terminal to access the machine.
- Now go to Amazon.
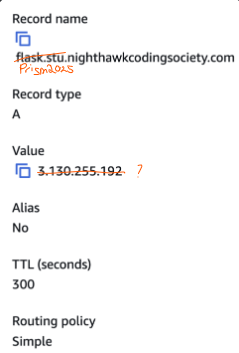
DNS & Routing
- Our group handled this part to find our route, type, alias, and IP address to locate our Prism service.
- IP address is a way to register our address.
- Right now, we are on an intranet.
- Intranet = local to campus.
- Internet = external/global.
- The DNS is set up by registering the domain in AWS Route 53
- We should have a subdomain:
prism. - Make sure the IP address is the exact same.
- DNS maps record names to computers.
AWS Setup
- Go to EC2.
- On EC2, go to Instances Running and scroll to the right to find the Elastic IP.
- We created a machine on AWS that has its own IP.
- Now, we’ll launch a new instance:
- Name it
xxx. - Pick Operating System.
- Choose Micro/Nano instance type.
- Set disk size, then click Launch Instance.
- Name it
- Reminder: Every one of these hardware instances costs money per hour.
Commands to set up container
docker ps: lists docker containers on machine- Pipe operator,
|, is used to feed output one command into another - Use the template that mort gave us, but modify it to our needs for prism.
- Copy the nginx_file template that we modified to the /etc/niginx/sites_available/
- Follow naming conventions using
mv <old_path> <new_path> - Make symbolic link that points to sites-available in sites-enabled using the
ln -scommand nginx -tto test configs and check syntaxcertbot --nginxand follow prompts to enable ssl for site
Commands to get latest chagnes
docker-compose downtake down docker containergit pullto restore committed changesdocker-compose buildto read Docker compose file and build container- Don’t forget to back up database and restore between builds
-
docker-compose up -dto start docker container
Backup/restore feature
- Crontab
- Crontab is a task scheduler that runs scripts at scheduled intervals.
- We can use crontab to run
db_backupat scheduled intervals using the following steps: - Run
crontab -eto edit your user’s crontab file 0 1 * * * bash /home/ubuntu/prism_backend/scripts/prsim_backup_sequence.sh- This command runs a script every day at 1 AM.
- Using the
RUNcommand in the Dockerfile in prism_backend to run db_init, restore, and backup
Contents of /home/ubuntu/prism_backend/scripts/prsim_backup_sequence:
    #!/bin/bash

    cd /home/ubuntu/prism_backend

    # Verify the installation and check the Python version
    python --version

    # Create a virtual environment if it doesn't exist
    if [ ! -d "venv" ]; then
        python -m venv venv
    fi

    # Activate the virtual environment
    source venv/bin/activate

    # Install the required Python packages
    pip install -r requirements.txt

    cd /home/ubuntu/prism_backend